
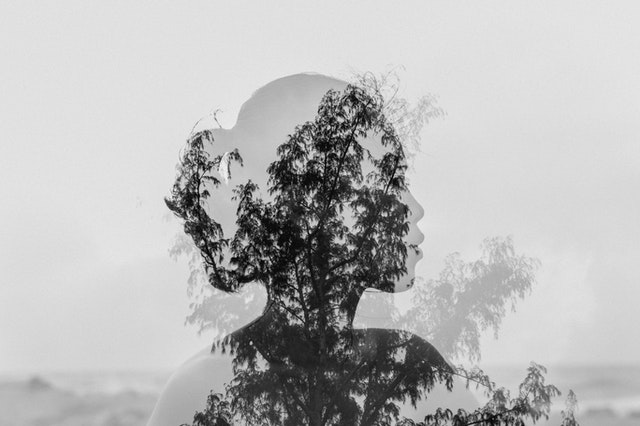
Have you seen the amazing effect when two images are smoothly placed over one other? That’s a double exposure effect, and it’s a great way to add interest to a picture. Double exposure is a very adaptable and imaginative method that allows you to produce an infinite number of intriguing effects.
Tips for Creating a Double Exposure
- Select eye-catching photos. When selecting stock images, consider how one picture will complement another. Find interesting perspectives, experiment with symbolism, and focus on each image to bring out the best in its counterpart. Merge images in existing layers in creative ways, and experiment with using more than one photo.
- Experiment with different exposures. There are no magic exposure settings when learning how to do a double exposure in Photoshop. Each image will necessitate distinct brightness and contrast changes. Adjust the exposure of photographs with Brightness/Contrast, Curves, and Levels. The usual rule of thumb is that if you want a certain section of a portrait to stand out, make it bright. Make that region black if you want the underlying picture to display.
- Experiment with different layer modes. Exposure on both sides Screen is frequently recommended in Photoshop lessons. Lighten, on the other hand, has a lot of potential. It’s always worth experimenting with different layer modes to see how they interact with one another, producing unexpected and intriguing outcomes.
How to Do a Double Exposure in Photoshop
You’ll need two separate pictures to make a double exposure photograph.
- A representation of a human or an animal. This should be a portrait photograph.
- Image of a background Only a landscape image.
Step 1: Select Two or More Pictures
First, choose a picture. You may use any image you like. It is preferable to utilize a portrait photograph as your basis image. You will need one portrait photograph and at least one other image that will blend with the portrait to begin our double exposure technique. And select an image with a solid background. If you choose an image with a noisy background, it will be difficult to deal with the image. So choose a photo with a natural background.
Step 2: Extract the Main Image
Next, you can extract your portrait image using Select Subject, or whichever technique you like. Whatever technique you use to extract your image, be sure you utilize Layer Masks, since you will be using the subject’s mask in subsequent phases.
After you’ve finished extracting, add a white Color Fill layer beneath your subject. You may skip this step if your portrait is already on a clear white background.
Step 3: Modify the Base Portrait
With the background of the image blocked off, we can perform some basic layer altering to be ready for the double exposure effect.
- First, go to Image > Adjustment > Hue Saturation and decrease the Saturation to -100. The image will be converted to black and white as a result of this.
- Then, go to Image > Adjustments > Levels and add the left and right toggles. This will darken the image and increase the contrast. You can utilize Smart Objects or adjustment layers to fine-tune the exposure of your image if necessary.
Step 4: Align the Secondary Images
When you right-click on the portrait layer mask, you can select Apply Layer Mask from the dropdown menu. In the Layers panel, change the Blending Mode of the portrait layer to Screen. The ideal double exposure effect is now visible.
Step 5: Apply Slight Alterations to Secondary Images
You can now build a Black and White Gradient Map adjustment layer and make some little changes to your secondary images. Then, build a Color Balance adjustment layer above the Gradient Map layer. Finally, you may choose Brightness/Contrast to modify the contrast of your secondary photos if necessary.
To provide contrast you must utilize the level menu to accomplish this.
- Navigate to Image, then Adjustment, then Levels, or simply type Ctrl + L on your computer to enter the level menu.
- Slide the top right level to the left to brighten the image.
- In order to create a contrast slide, move the top left level to the right.
- Alternatively, you may simply enter fixed values into boxes to brighten and contrast the image. Black-7, Gray-1.15, White-197
- Put these values in and click OK. Now look at the image; it should be brighter and have more contrast than before.
Step 6: Duplicate the Main Image
Duplicate the main subject picture and place it over the group of environmental layers. Set the duplicate to the Screen mode.
In Photoshop, there are two basic ways to duplicate an image.
- Navigate to the Picture menu when the image is open in Photoshop. Select Duplicate from the drop-down menu. In the picture duplicate dialog box, give your copy a name and choose or deselect the Duplicate Merged Layers option. When you click OK, the replicated picture will open in a new window.
- If you don’t want to utilize the dialog box when copying, press ALT on Windows or Opt on Mac and pick Image > Duplicate.
Step 7: Change the Exposure of the Duplicated Main Image
This is when your exposure comes into play. This is how you perform a double exposure in Photoshop. Adjust the Levels of the top topic layer. Again, the settings will differ from image to image, with skin tone playing an important role. Lighter skin tones will almost certainly need to be darkened, while darker skin tones’ highlights will need to be brightened.
Step 8: Fine-Tune the Final Composition
After you have determined your subject’s facial traits, you can go back and modify your final composition by shifting the ambient photos around to better fit our subject’s facial features. Attempt to arrange things logically.
Step 9: Improve Facial Features
After you have finalized the composition, you can improve your face characteristics to make them look more substantial. You can also add two more layers. Overlay the first layer and clip it to the higher subject layer. Use this layer to bring out the highlights in the subject. Paint whites on the areas you want to stand out.
Second, a Soft Light layer is put beneath the upper subject layer but above the ambient group. Paint black on portions of the face that you want to seem more solid, such as the eyes, nose, and lips. You can also accentuate the brows.
The black layer can also be used to obscure any distracting elements in the environmental layers.
Step 10: Final Masking
Then, you will finish your image by blocking off any distracting elements on it. If the section is left uncorrected or seems to be uncorrected, you must print the field with the brush tool.
Step 11: Color Grading
Color may be used to develop a style and atmosphere. It is also highly useful when putting together a series of images. Finally, you can finish off the image with a fast color grading using a single Curves adjustment layer. All color modifications, however, are optional and may be simply altered from image to image.
Conclusion
Double-exposed photos are quite popular and trendy these days. You have now learned how to do double exposure in Photoshop in this article. The result is both visually appealing and simple to execute. Following the procedures outlined above, anyone may easily make a stunning double exposure photograph.

Leave a Reply